

Bad food photo retouching can ruin your Instagram growth, even when you work hard to create appetizing content. Many photographers capture beautifully plated dishes that fail to impress on social media because of simple editing mistakes. The art of food photography retouching demands technical expertise and careful restraint. Professional results often emerge from subtle techniques rather than flashy filters or effects. Our team has mastered food photo retouching Photoshop methods that make images pop naturally during our 15+ years of industry experience. Your Instagram engagement and follower count might suffer from five critical mistakes we've identified. Our team has supported over 4000 global brands for more than two decades. We've witnessed how correcting these common errors turns ordinary food photos into compelling content that attracts followers consistently.
Why Food Photo Retouching Matters on Instagram
Instagram has become a visual battleground. Quality images no longer just boost your presence—they determine if you'll survive. Food creators and businesses trying to grow their following know this truth well: "we eat with our eyes first."
The Visual-First Nature of Instagram
A simple photo-sharing app in 2010, Instagram has changed into a rich platform for storytelling, self-branding, and creativity. The platform stays true to its visual roots, with food photos ranking among the most powerful ways to grab attention. Restaurants and food creators can't ignore this visual-first reality. Research shows 82% of millennials pick restaurants just by looking at their online photos. Customers trust restaurants more when they see high-quality visuals. Instagram became crucial during the pandemic. Restaurants, chefs, and entrepreneurs turned to it as their lifeline. The platform became their new digital storefront, letting them showcase food when people couldn't dine in. Each square post doesn't just show food—it drives real sales. People form quick first impressions that shape all future interactions with your brand. Professional food shots create that great first impression, drawing customers in before they taste your food. A well-curated Instagram feed full of professionally retouched food photos keeps current customers interested while attracting new ones.
How Food Photography Drives Engagement
Numbers paint a clear picture of food photography's power. Studies show food photos get 30% more engagement than other photos. Photos with filters get 16% more views than raw, unedited shots. Great food photos boost delivery app orders by 35%. This power goes beyond digital platforms—beautiful food makes customers think better of the dish's quality, taste, and value. The science makes sense. People remember only 10% of what they read, but that jumps to 65% when paired with relevant images. Quality food photography builds brand trust too—restaurants showing appealing food tend to get better reviews. Food photos work better than text-heavy posts for social media marketing. The money spent on professional food photo retouching pays off in many ways—boosting sales now while building lasting customer trust.
Why Editing Is More Than Just Filters
Slapping a simple filter on food photos won't cut it anymore. Good food photo retouching uses smart techniques to improve without faking the natural beauty of dishes. Smart editing creates balance. It makes subtle lighting tweaks to highlight textures, fixes colors to make food look more appetizing, and guides viewers' eyes through the image naturally. Bad backgrounds can ruin great food shots. The right background sets the mood and lets food shine. Research shows good backgrounds help conversion rates by keeping customers focused on the food. New AI tools can make complex lighting and color adjustments that once needed expert photo retouchers. These tools help creators set specific moods—giving winter stews a "warm, inviting glow" or making summer salads look "bright and airy." Professional photos have become what customers expect. Learning proper food photo retouching techniques helps you do more than follow trends—it puts your content ahead in this competitive digital world.
Mistake #1: Over-Editing That Makes Food Look Unreal
Your delectable dish becomes something no one wants to eat the moment you push those editing sliders too far right. Many food creators believe more vibrant colors and sharper details will create more engaging content. The opposite usually happens.
Too Much Saturation or Contrast
Excessive saturation ruins food photos more than anything else. Colors that become too concentrated cross the line from appetizing to artificial. Our brains know what food colors should look like, which helps us tell ripe, safe food from spoiled items. This basic instinct makes viewers doubt unnaturally vibrant food photos right away. The contrast slider creates harsh divisions between light and dark areas that you rarely see in ground food scenarios. Food photos look flat or lifeless because they lack proper contrast balance, not insufficient editing. Good food photo retouching needs contrast through several techniques—not just the contrast slider. The clarity slider needs special care. This adjustment looks magical at first since it improves midtone contrast and makes textures stand out. Too much clarity makes food look dry and unappetizing. Professional food photographers prefer vibrance over saturation because it enhances only the weaker colors in your image rather than intensifying everything.
Unnatural Textures and Colors
Amateur food photography retouching shows up in bizarre textures that real food never has. Too much sharpening creates weird edge halos around food items. These technical flaws tell viewers they're seeing heavily edited images instead of something mouth-watering.
Color problems go beyond simple oversaturation. Bad white balance creates strange color casts that make tasty dishes look unappetizing. Foods should match their expected color ranges—strawberries need to be red, not purple, while bread should look golden-brown, not orange. Our brains notice even tiny shifts from these normal colors.
Texture and clarity sliders can highlight food's natural appeal. Misuse creates artificial crispiness that looks more like computer graphics than real food. A professional food photographer's words ring true: "If you can see the editing, it's probably bad editing."
How to Keep Edits Realistic
Think about editing as a way to reveal your food photos' natural beauty rather than changing them. Start with quality photos—no editing magic can fix poorly lit, badly composed shots. These approaches work well to retouch food photos in Photoshop:
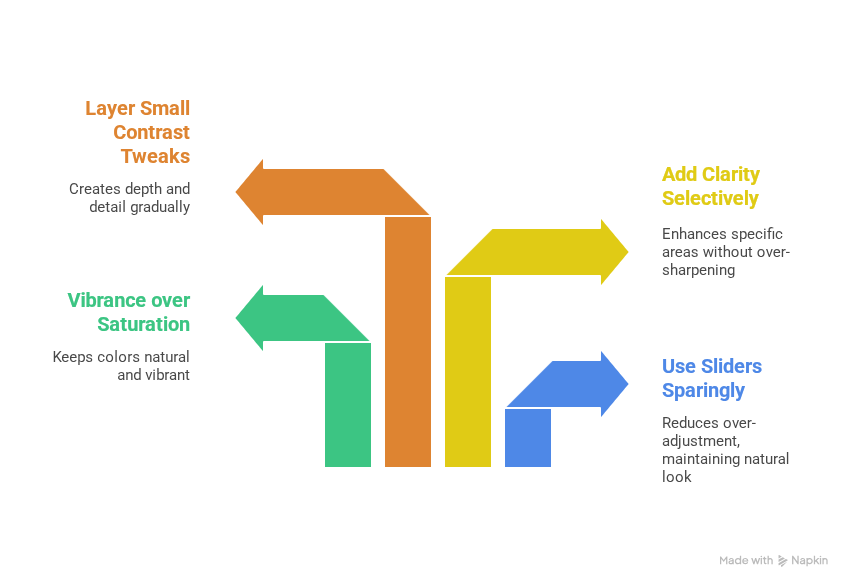
- Use all sliders sparingly—cut your usual adjustments by half
- Pick vibrance over saturation to keep colors natural
- Add clarity to specific areas instead of the whole image
- Layer several small contrast tweaks instead of one big change
The best food photo retouching builds up through many small adjustments. Keep your brush flow around 10% to retouch blemishes or make corrections. This subtle method stops obvious editing marks or repeated patterns that look fake. Ask yourself if the food still looks edible. Your edits have gone too far if the photo no longer makes people hungry. Professional food photographers check their edits at different zoom levels and take screen breaks to judge what looks natural versus overdone.
Mistake #2: Ignoring Background Distractions
A beautifully plated dish loses its appeal when photographed against a distracting or messy backdrop. Your background isn't just a passive element—it's the foundation of your entire food photo. If you ignore this vital aspect, you'll waste all the effort you put into styling and plating your culinary creations.
Cluttered or Messy Backgrounds
Background distractions show up in many forms: random utensils, spills, unintentional crumbs, or even your own shadow in the frame. These small elements create visual noise that draws attention away from your food and makes your work look amateur to your audience. Your background sets both mood and context, letting the dish be the star. A well-chosen background isn't just about looks—it helps boost conversion rates by keeping viewers focused on your food. In my experience, even professional chefs often miss background elements that reduce their photos' effectiveness. "Pay attention to the placement of your props too. Look for groupings that become too strong or arrangements that look too regimented. Even a simple fork placed at an awkward angle can ruin a shot". These small distractions can surprisingly hurt your final image.
When to Use Background Replacement
Sometimes, no amount of on-set styling creates the ideal backdrop. Background replacement offers a powerful solution for food photo retouching. This technique works best in several scenarios:
- E-commerce and delivery apps often require products on clean, consistent backgrounds. Platforms like DoorDash and Uber Eats have strict rules that require food to appear on white or single-color backgrounds.
- Food photography communicates ambiance and mood. Getting the perfect background for every shot would mean buying countless tabletops, woods, and linens—items that cost money and take up storage space. Digital replacement gives you versatility without the hassle.
Precise selection starts your food photo retouching in Photoshop. After selecting your subject accurately, you can work on your background by duplicating layers and adding masks. This keeps your original image safe while giving you unlimited creative freedom.
Tips for Clean, Minimal Compositions
You don't need elaborate setups for stunning food photos. A minimalist approach often creates the most professional results:
- Choose appropriate surfaces: Find backgrounds with textures, spots, and grain that interest without distracting. Food looks fresh and appealing on cool, neutral, and desaturated backgrounds.
- Create depth: Place your background away from your subject to add visual depth. Food looks "stuck" to backgrounds that are too close, creating a flat look. Moving your table away from the background adds depth to your shots.
- Embrace negative space: Food photography retouching benefits from negative space. "The power of negative space is that it will balance out your dish, allow your viewer to move to the important subject and connect with it on a deeper level". Put your subject off-center and leave breathing room around it.
- Remove distractions before shooting: "Remove clutter or non-desirable items from the shot and give your images a simple, non-distracting background". This prep saves time in post-processing.
- Consider background colors carefully: "Avoid bold, bright colors that will steal focus from your main subject". The background should enhance, not compete with, your food.
A lower aperture setting helps blur backgrounds naturally and emphasizes your food while reducing distractions. This technique creates depth of field that draws attention to your delicious creation. Minimalist food photography makes you focus on the food itself instead of using props to tell the story. "The first and most powerful benefit of trying on a minimalist food photography hat for a day is that it forces you to really focus on the food that you are shooting".
Mistake #3: Poor Lighting and Shadow Correction
Light forms the foundation of all photography. Getting it wrong can make even the most perfectly styled dish look unappetizing. Professional food photographers know that lighting isn't just about brightness. It's about creating dimension, texture, and mood that makes viewers want to reach through their screens and take a bite.
Flat Lighting That Kills Depth
Flat lighting is one of the most common and devastating mistakes in food photography. Your images look two-dimensional and lifeless when light floods the scene from multiple directions without clear direction. This often happens with overhead kitchen lights or when photographers use multiple light sources at once. The biggest problem with flat lighting is how it erases natural shadows that give food its appetizing texture. Your audience won't notice the crispy exterior of fried chicken or the fluffy interior of a cake. These textural elements vanish without proper shadows, making your food look artificial and unappealing. Directional light creates contrast between highlights and shadows that give food its three-dimensional quality. Light naturally decreases with distance from its source (known as "falloff"), which adds depth to your images. Your setup closer to a single light source—typically a window—creates more dramatic falloff and richer shadows. These shadows add dimension to otherwise flat compositions. The solution to flat lighting isn't adding more light, though it might seem counterintuitive. You need to be more intentional with a single, dominant light source.
Harsh Shadows That Distract
Harsh, distracting shadows sit at the opposite end of the lighting spectrum. Direct on-camera flash or shooting in direct sunlight creates stark divisions between light and dark areas. These divisions make food look unnatural. Front lighting causes major issues in food photography. Light coming from the same direction as your camera makes all shadows fall behind your subject and out of sight. This flattens your image and removes detail. It creates that unmistakable "flash photography" look that screams amateur content. You don't need expensive equipment to fix harsh lighting. A white curtain can diffuse window light while maintaining directionality for natural light photography. Overcast days work great for outdoor food photography. They provide soft, even light without direct sun's harshness. Artificial lighting needs modifiers like softboxes. These transform direct, harsh light into soft, diffused illumination that looks like natural light. Your light source's size relative to your subject affects shadow quality. Larger, closer light sources create softer shadows that boost rather than detract from the image.
Using Photoshop to Balance Light
Food photo retouching in Photoshop becomes crucial when perfect lighting wasn't achieved during the shoot. The goal isn't to remove shadows completely—they provide necessary depth. Instead, balance light and shadow to make food look more appetizing. Here's an effective food photography retouching technique using adjustment layers to enhance or reduce lighting elements:
- Use the Levels adjustment (Ctrl+L) to increase contrast and adjust brightness
- Apply the "Yin Yang" technique with layer masks to selectively brighten or darken specific areas
- Use gradient masks to create subtle lighting transitions that appear natural
- Correct white balance to remove unwanted color casts from artificial lighting
Shadow direction in your food photos shapes the final look. Side lighting creates the most appealing food photographs. It reveals texture while keeping things natural. You can boost this effect in Photoshop by darkening the shadow side slightly and enhancing highlights on the lit side. Good lighting correction needs balance. Overly bright areas look just as unappetizing as dark, muddy shadows. The best food photo retouching avoids extremes. It aims for natural-looking light that enhances your dish without distraction. Mixed lighting sources create the toughest situations to correct. Combining window light with kitchen overheads leads to confusing color casts that make food look unnatural. Shooting in RAW format gives you more flexibility to fix these issues during the food photography retouching process.
Mistake #4: Inconsistent Color Correction
Color consistency in your food photos works like an invisible thread that connects your Instagram feed. Many photographers put all their effort into single shots but miss how their photos look together. This oversight can quietly limit their growth on the platform.
Why Color Consistency Matters for Branding
Your brand's color palette should flow through all your visual content to build brand identity. This makes your content easy to spot right away. A consistent look turns casual browsers into followers who feel connected to your unique style. People recognize brands through visual patterns. Your signature colors create subconscious associations when viewers see them often enough. Food brands get special benefits from this connection. A bakery might use soft pastels in its frosting shots, while a coffee shop could showcase earthy tones through wooden tables and natural light.
Common Hue and Tone Mismatches
Color correction often goes wrong with too much variation, wrong white balance, and clashing color temperatures. Light sources affect color temperature differently. Daylight looks cool and bluish, while indoor lights give off a warm yellow-orange glow. Green foods need special attention. A slight yellow adjustment helps them look fresh and natural. It also helps to avoid using the same editing approach in different lighting situations. This leads to photos that tell an inconsistent visual story. Balance plays a vital role - color should boost your image without stealing attention from the food. You want to make food look appetizing through good color correction, not perfect. Warm tones make most food photos more inviting and hunger-inducing.
Using Food Photo Retouching Photoshop Tools Effectively
The HSL panel gives you precise control over your food photography with three key adjustments:
- Hue: Makes colors shift their tone (like turning reds more orange or pink)
- Saturation: Changes how intense each color looks
- Luminance: Controls how bright each color appears
Color grading adds colored tones to shadows, midtones, and highlights to set the mood. Subtle changes work best for food photos. Warm colors create cozy feelings perfect for comfort foods. Cool colors make salads look fresh and crisp.
Creating your own editing workflow helps keep things consistent. You might want to make custom presets that match your style. These saved settings work on multiple photos with minor tweaks. Your Instagram feed stays visually harmonious, and viewers will notice - even if they don't realize it.
Mistake #5: Leaving Unwanted Objects in the Frame
Small details create the biggest impact in food photography. We removed unwanted elements that could ruin an otherwise perfect shot. Your food images can lose their professional appeal due to crumbs, spills, stray utensils, or even reflections in shiny spoons.
How Object Removal Improves Focus
A clean food photo helps direct viewer attention to the right spots. Every element in the frame should serve a purpose, according to professional food photographers. Your beautifully styled dish becomes the main focus when distracting elements disappear from the frame.
Examples of Distracting Elements
Common unwanted objects that require removal include:
- Food crumbs and seeds scattered around the plate
- Spills and sauce smudges that look messy rather than artistic
- Reflections in glassware or metal utensils
- Creases between backdrops
- Surface scratches or imperfections
Tools to Clean Up Your Food Shots
Several powerful tools can help perfect your food photos. The Spot Healing Brush excels at removing small blemishes and crumbs. The Clone Stamp tool can replace scratched surfaces with clean areas from other parts of the image. Content-Aware Remove tools fill larger distractions with matching textures intelligently.
Your retouching should remain subtle. Set the brush flow to around 10% to achieve natural-looking results without creating obvious patterns in your edits.
Conclusion
Food photography on Instagram needs both technical skill and artistic restraint. This piece reveals five critical mistakes that might be holding back your Instagram growth despite your best efforts. These changes will help turn your content from amateur to professional quality. Over-editing tops the list of common pitfalls. Note that subtle adjustments create more appealing results than dramatic changes. Your audience wants authentic, appetizing images they can almost taste through their screens. Professional food photography depends heavily on background elements. Clean, thoughtful backgrounds let your culinary creations shine without distraction. Of course, this simple change often separates scrollable content from shareable posts. Light shapes how people notice your food. You should focus on capturing beautiful light during your photoshoot instead of fixing poor lighting later. Photoshop tools can boost lighting when needed—just keep the results natural. A consistent color scheme brings your feed together and builds brand recognition. Your distinctive editing style creates visual harmony that pulls in followers who connect with your work. Your delicious creation deserves full attention, so remove distracting elements. These finishing touches affect by a lot how professional your content looks. We've spent 15 years perfecting these techniques while working with thousands of global brands. The gap between stagnant and growing Instagram accounts often comes down to these small details. Your audience responds to quality, and these improvements will make your food photos stand out in competitive feeds. Food photography retouching boosts reality rather than creating perfection. Good editing goes unnoticed by your audience. They should feel drawn to your mouthwatering images, double-tap, and keep coming back for more.
Key Takeaways
Master these five critical food photo retouching mistakes to transform your Instagram content from amateur to professional quality that drives real engagement and follower growth.
- Avoid over-editing: Keep saturation and contrast adjustments subtle - if you can see the editing, it's probably too much
- Clean up backgrounds: Remove distracting elements and use minimal compositions to make your food the hero of every shot
- Master lighting balance: Use directional light to create depth and texture, avoiding both flat lighting and harsh shadows
- Maintain color consistency: Develop a cohesive editing style across your feed to strengthen brand recognition and visual harmony
- Remove unwanted objects: Clean up crumbs, spills, and distractions to focus viewer attention entirely on your delicious creation
Professional food photography isn't about creating perfection—it's about enhancing reality with restraint. When executed properly, your edits should be invisible while making your food irresistibly appetizing to scroll-stopping audiences.
FAQs
Q1. How can I avoid over-editing my food photos for Instagram? Keep adjustments subtle and natural-looking. Use vibrance instead of saturation, apply clarity selectively, and reduce your standard adjustments by about 50%. Always ask yourself if the edited photo still looks appetizing and edible.
Q2. What's the best way to create an appealing background for food photos? Choose clean, minimal compositions with appropriate surfaces that complement your food without distracting from it. Use negative space effectively, and consider background replacement techniques when necessary to achieve the desired look.
Q3. How can I improve lighting in my food photography? Use directional lighting, preferably from the side, to create depth and texture. Avoid flat lighting or harsh shadows. If shooting in natural light, diffuse window light with a curtain. In post-processing, use adjustment layers to balance light and shadow for maximum appeal.
Q4. Why is color consistency important in food photography for Instagram? Consistent color use across your photos reinforces brand identity and makes your content instantly recognizable. It creates a cohesive look in your feed, turning casual viewers into followers who connect with your distinctive style.
Q5. What tools can I use to remove unwanted objects from my food photos? Use the Spot Healing Brush for small blemishes and crumbs, the Clone Stamp tool for replacing scratched surfaces, and Content-Aware Remove tools for larger distractions. Always retouch with restraint, using a low brush flow for natural-looking results.
Get Free Trial: [https://studiometrodesk.com/free-trial]
Get A Quote: [https://studiometrodesk.com/get-quote]
Abdul Hashib Bipu
01 Dec 2025
From the blog
The latest industry news, interviews, technologies, and resources.

Abdul Hashib Bipu • 11 Dec 2025 • 21 min read
Perfect E-commerce Product Photo Retouching Service For Entrepreneurs
Studio Metrodesk creates experiences that quickly establish credibility through their retouching services.
Post Production Company
Professional Photo Editing

Abdul Hashib Bipu • 07 Dec 2025 • 18 min read
High-Quality Product Photo Editing Create Significant Edge In Today's Competitive Beauty Market.
Compelling visual stories emerge when dimension transforms flat product images into artistic retouched photo.
Post Production Company
Professional Photo Editing

Abdul Hashib Bipu • 02 Dec 2025 • 21 min read
How Editorial Retouching Services Helping Top Retail Brands Grow
Professional retouchers create separate layers for texture and color at the time they work on editorial skin.
Professional Photo Editing

Abdul Hashib Bipu • 27 Nov 2025 • 21 min read
The Truth About Editorial Retouching Services: What Top Retail Brands Won't Tell You
Professional retouchers start with an original assessment of the raw files before any pixel manipulation begins.
Professional Photo Editing

Adnan • 24 Nov 2025 • 20 min read
What Top Brands Get Wrong About Fashion Accessories Retouching
Professional retouchers boost existing shine points rather than creating artificial ones.
Product Photo Retouching
Professional Photo Editing

Abdul Hashib Bipu • 23 Nov 2025 • 19 min read
Real vs Fake: How Footwear Retouching is Changing Fashion Forever
From precise clipping paths to shadow creation, these tools give brands powerful ways to showcase their products.
Post Production Company
Professional Photo Editing
Hey! As you have come this far, why don't you take a chance on us?
Try Us for Free